blisteringlydrunk

food amongst family and friends

Prosciutto Date Wraps – The Perfect Marriage of Salty and Sweet August 29, 2011

Filed under: Appetizers,Make Ahead,Quick and easy — blisteringlydrunk @ 8:24 am
Tags: , , , , ,

These are a family favourite that my mom came up with (I’m not sure from where) several years ago. They are the perfect simple, yet fancy appetizer and they go well with wine or beer, depending on your mood. Plus I find I often have these ingredients (or a variation of them) in my house.

These can be rolled up a day or two ahead of time and kept in an airtight container in the fridge. Makes 12.

6 large medjool dates

1 thick (1/2″) slice of gruyere (old gouda or provolone is nice here as well, and Meagan recommended blue cheese, which sounds lovely) cut into 12 chunks

12 slices prosciutto (with smaller dates you can get away with only half a slice of prosciutto per wrap, so plan accordingly)

Olive oil for brushing

Toothpicks

Fresh ground pepper

1. Preheat oven to 375. Half and pit the dates, then stuff a chunk of gruyere in each half.

2. Wrap a piece of prosciutto around each one, trying to cover all sides (to prevent cheese leakage), and then skewer with a toothpick.

3. Place on a cookie sheet, brush lightly with olive oil, generously dust with pepper and then pop in the oven for about 10 minutes. The prosciutto should be getting crispy and the cheese should be melted (there will inevitably be some leakage). Serve hot!

Enjoy!

Ky


Goat Cheese Cheesecake in a Jar August 27, 2011

Filed under: Baking,Cakes,Canning,Desserts,Make Ahead — blisteringlydrunk @ 1:51 pm
Tags: , , ,

No matter what way I attempt to start this post, I feel like I am in confession. “Bless me Father, for I have sinned. It’s been two weeks since my last post . . . ” I will try and do better, but I promise this recipe was worth the wait. This was very much an experiment, and a mix mash of a few recipes (here and here were the main inspiration). The idea for the granola topping came from a visit to the Boxwood Cafe here in Calgary, but the granola recipe came from ELS, followed almost exactly (I left out the raisins and chopped the almonds; best granola ever, I especially love it with dried tart cherries mixed in) and the berry topping was simply taken out of a jar of these canned blueberries. That said, not to toot my horn, but the whole was way more than the sum of the parts. This was really lovely; creamy and sweet, but slightly tart, beautifully contrasted by the crunch of the granola and all tied together with a thin layer of treaty amaretto blueberries. Yummy. And, honestly, not that difficult. The cheesecake portion only took 20 minutes to put together (not including cooking and cooling time) and then you could use whatever fresh or canned berries you have kicking around and same goes for the granola. The presentation is fun and we actually all layered up our own; I just set the jars of granola and berries on the table so everyone could dress it up the way they wanted.

1, 8 oz package of cream cheese

10 oz chevre

1/2 cup sugar

3 eggs

1/2 tsp vanilla

zest of 1/2 a lemon (or an orange)

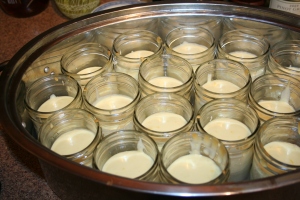
I tripled the recipe and had to use my turkey roaster to fit them all in.

1. Preheat oven to 325. Find 6 clean 250 ml jars and arrange them in a roasting pan.

2. Using an electric or stand mixer, beat together cream cheese, chevre, and sugar until well combined and smooth.

3. Beat in eggs one at a time, mixing very well in between each addition, then add in vanilla and zest, mixing one more time to combine.

4. Divide the mixture evenly between the jars. Add boiling water into the roasting pan until it reaches about 3/4 of the way up the side of the jars.

5. Bake for 25 minutes or until set at the edges, but still slightly wobbly in middle when shaken. Turn off the oven and open the door, allowing the cheesecake to come to room temperature (an hour or so) before putting the lids on and placing in the fridge. Let set at least an hour in the fridge, but overnight is best. Top with granola and berries and serve.

Enjoy!

Ky


Mom’s Dilled Carrots August 13, 2011

Filed under: Canning — blisteringlydrunk @ 10:24 am
Tags: , , ,

Sundays growing up were always church in the morning, followed by Mom putting a stack of grilled cheese sandwiches on the counter with a big bowl of dilled carrots. It’s possible (probable, even) that we didn’t have this every Sunday after church (and that we didn’t go to church every Sunday for that matter), but that’s the joy of nostalgia and it’s ability to skew our memories to suit our purposes. These are a favourite in my house now, and as soon as a jar is opened, it’s gone, so I try to make a lot of them. That said, the joy of this recipe is that you can make as many or as few as you would like and the amount of work is directly proportionate to the amount you want to make. Feel free to adjust this to suit your tastes; throw in a jalepeno if you like spicy pickles; use as much or as little dill as you like; up the garlic if you like that, or leave it out altogether; some mustard seeds in there might be nice. I would recommend using fresh from the garden carrots (farmer’s markets are great for this); it makes a huge difference in how these taste. And if you’ve never had carrot pickles before, this is so worth a shot.

Per 1/2 Litre Jar:

3 cloves garlic

handful fresh dill

1/2 lb (approx) baby carrots, scrubbed and trimmed

Brine (for 8-10 1/2 Litre jars):

4 cups vinegar

12 cups water

1 cup pickling salt

1. Place garlic and half the dill on the bottom of each sterilized jar.

2.  Stuff with carrots, and I mean really stuff them in there. Top with remaining dill, making sure there is still sufficient head space for the lids to seal (some carrots may need to be shortened).

3. Make the brine by combining all ingredients in a large pot and bringing it to a boil.

4. Get your lids ready by placing them in a bowl and covering with hot (I use boiling) water. Pour the hot brine into the jars leaving about 1/2″ head space, one at a time, covering with lids and rings as you go.

5. The jars should seal as they cool, but make sure to check them all before storing. If there are any that haven’t sealed you can either keep them in the fridge (they will be fine for a couple months because of all the vinegar, the same way an open jar of pickles would be) or pour the brine back out, bring it to a boil, wipe the rim of the jar, double check that carrots and dill are not too close to the lid, and try again. Usually mine don’t seal if a stray piece of dill gets on the rim or I have a carrot that is too long and is sitting against the lid.

6. Let sit for at least 2 weeks before eating. The longer they sit, the better the flavour.

Enjoy!

Ky


Pesto in a Pinch August 10, 2011

Filed under: Quick and easy,Sauces,Vegetarian — blisteringlydrunk @ 8:10 am
Tags: , , , , ,

I spent the better part of Saturday making carrot pickles (post to come), including harvesting the 8 lbs of dill that I pulled out of my back bed where I had obviously let some dill go to seed last summer. Anyway, it was one of those days where everything took longer than I thought; more dill to deal with than I thought, forgot to buy the garlic, broke a jar everywhere , etc, etc. So at 6:10pm, when I was finally finished with the pickles, I realized that I had no idea what to feed my already starving children. Thankfully I had picked up my CSA veggies the day before, and had heard tell of the possibility of a pesto made from garlic scapes; they say that necessity is the mother of invention and, in this case, a very tasty invention. Dinner was on the table in 12 minutes flat, and most of that time was boiling water and cooking pasta; the pesto was ready in about 2 minutes and was an unadulterated success with children and parents alike. I can’t believe I’ve never made pesto before, but I know I will be making it again. We had ours with grated gruyere and fresh pepper and sea salt on top. Yummmmm.

1 handful garlic scapes (about 5 or 6)

1 big handful basil

1 big handful pinenuts (walnuts would also work here and possibly pecans. If I wanted to go nut free, I think I might just leave this out altogether and add a little extra cheese)

1 big handful fresh grated parmesan

Drizzle or two of olive oil (probably no more than 1/4 cup total)

1. Throw everything but the olive oil in the food processor. Feel free to add your own flair; toast the pinenuts, add other herbs, try some arugula in there, use roasted garlic scapes instead of raw or just straight up roasted garlic; use your imagination and fridge (or garden) contents. Pulse until fairly evenly chopped.

2. Turn the processor to on and pour olive oil in through feed tube until desired consistency is reached.

3. Toss with fresh pasta (and maybe a little more olive oil), top with cheese, salt and pepper and serve. Or freeze for another day. Or spread on baguette rounds, top with brie and broil for a minute. Or roll it up in puff pastry. Or spread it on a pizza crust and top the way you will. Or, well, you get the point.


Enjoy!

Ky


Easy Peasy Canned Berries August 7, 2011

Filed under: Canning — blisteringlydrunk @ 8:44 am
Tags: ,

I ran into a neighbour the other day who has lived in our neighbourhood since inception in the late 60s, so naturally she proceeded to ask me about the raspberry bushes that she transferred to my yard 20 years ago. I mentioned that they were having a good year and we started trading recipes. She mentioned raw packing the berries in a light syrup, which I hadn’t heard of, but sounded incredibly easy and tasty. So, I went home and did a little research and decided to give it a shot. This recipe is based mainly on Wilda’s advice. I had a few cups of both blueberries and raspberries so I thought I would try some different kinds, and, just to add my own twist, I added liquers (Amaretto to the blueberries and Grand Marnier to the raspberries). The result looks fantastic, but I haven’t actually busted into them yet, the  taste test still being a few weeks away. What I will say is this; easiest fruit canning experience of my life and they look beautiful and, I think, would make a great gift. Worth a shot for sure if you have a few berries kicking around. Other flavour suggestions would be to add some fresh lavender or mint to the jars; use what you have.

Berries (Blueberries, blackberries, raspberries, saskatoons, etc.)

Sugar

Water

Various liquers or herbs to taste (optional)

1. Sterilize as many jars as you need. Fill the jars just to the neck with berries and make sure to really pack them in there or your jars will end up looking half empty (I made this mistake with the blueberries). If using fresh herbs, I would pack them in the bottom of the jars.

2. Make a light syrup by using a 2:1 ratio of water to sugar. For three 1/2 pint jars I used 2 cups of water and 1 cup of sugar. Put in a saucepan and just bring to a boil until all traces of the sugar have disappeared. Meanwhile place the lids of your jars in a bowl and cover with boiling water.

3.  Pour a tablespoon of liquer (if using) into each jar of berries, then fill just to the neck with the syrup (over filling will result in an overflow during the water bath; I found out the hard way). Place the lid on top and screw on the ring.

4. Process the jars in a boiling water bath (the top of each jar should be covered by at least an inch of water) for 10 minutes (start timing when the water returns to a boil).

5. The jars should seal as they cool. I would give them a couple weeks before busting into them, just to give the flavours a chance to mingle.

Enjoy!

Ky